Exciting things are happening here at Spotted Dog Quilting Blog!
We are getting ready for a BIG move (physical location, I'm not moving the actual blog)!
I am suspending posts, including the Handmade Holidays Series, until after our move!
See you soon!
Monday, November 26, 2012
Thursday, November 15, 2012
Handmade Holidays - Gift Card & Gift Certificate Holder Tutorial
Hello! Welcome back to Spotted Dog Quilting Blog for the Handmade Holidays series! Today's tutorial was supposed to be Key Fobs, but the materials have not come in, so I am switching that tutorial with the Gift Card & Gift Certificate Holder.

The method of construction is the same for both sizes of the holders. Here is a list of materials that you will need:


1/4 yard of felt
Ribbon - at least 4-1/2"
Rotary cutter with a pinking blade or pinking shears
Ready to start?
For a gift card size:
Cut felt 5-1/2" x 4-1/4"
Cut ribbon 4-1/2"

For a gift certificate size:
Cut felt 7-1/2" x 8"
Cut ribbon 7-3/4"
Once your pieces are cut, we will add the ribbon.
For the gift card size:
Measure down 1/4" and pin ribbon to felt.

For the gift certificate size:
Measure 1" down and pin ribbon to felt.
Sew your ribbon to your felt:

Trim your threads and any extra ribbon.
Fold felt in half with the wrong sides together (I know this seems backwards, but we will sew again to encase the ends of the ribbon).

Sew down each open side with the smallest seam allowance that you can manage.

Clip your corners and trim your threads.
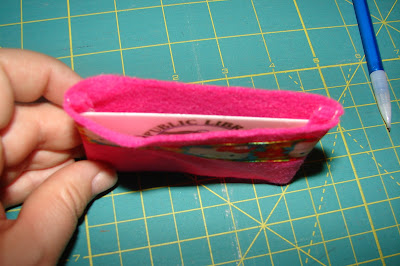
Now turn the holder inside out. It should look like this:

Sew sides of the holder again, enclosing the raw edges of the ribbon.
Turn right side out and you are ready to add your gift card!


As an optional finish, you can pink the top edges like this:

Once you give your gift card or certificate, these holders can be reused.
The gift card size can be used to hold:
Library Cards
Store Rewards Cards
Bus/Subway Cards
The gift certificate size can be used to hold:
Receipts
Coupons
Parking Vouchers
Thanks for visiting! I hope that this tutorial makes your special gifts a little more special!
Thursday, November 8, 2012
Handmade Holidays - Christmas Tree Skirt Tutorial
Hello! Welcome back to Spotted Dog Quilting Blog's Handmade Holidays series!
This week, we will be making a Reversible Christmas Tree Skirt.

Here is a list of materials that you will need to make your Christmas Tree Skirt:

- 1 yard background fabric (I used Kona - White)
- 1 yard backing fabric
- Combination of 1 yard of Christmas fabrics or scraps that are at least 4" x Width of Fabric (WOF)
- Pom-pom trim (in increments of 44")
- Ribbon (in increments of 44")
- Rickrack (in increments of 44")
- 1/2 yard of binding fabric or 8 yards of pre-made binding
- 36" x 44" piece of batting (I use Warm & Natural)
- Thread to match your Christmas fabric, pom-pom trim, ribbon and rickrack
- Walking foot for your sewing machine
- Sewing machine and sewing notions
***A note about fabric and trim selections - This is a wonderful opportunity to use novelty fabrics or special fabrics that you have been saving, as well as special ribbons and trims. I am in love with the gnomes on the fabric I chose, but I also could not bear to cut up the "Unruly Reindeer" Tammis Keefe tribute fabric. I chose to use the Tammis Keefe for the back so that I would not have to cut it up. Since the Christmas Tree Skirt is reversible, I can use that side face up as well. Also, the plaid ribbon with the cherries and strawberries is from a special trip to Carmel with my great friend Alethea. I wanted save it to use for a special project and it looks perfectly Christmasy with all of the other fabrics and trim!***
Ready to Sew???
First:
First we are going to make a quilt "sandwich".

Layer your fabric and batting in the following order:
1. Backing fabric - right side down
2. Batting
3. Background fabric - right side up
Your "sandwich" should look like the photo, except with all of the edges straightly aligned.
Second:
Using safety pins, pin the layers together, the same way you would if you were making a quilt. You could also use basting spray if you prefer.
Third:
Cut pom-pom trim, ribbon and rickrack into increments of 44" in length. Make as many or as few as you would like - remember - you can always cut more later if you don't have enough.

Fourth:
Cut your Christmas fabrics into the following strips:

Fabric 1: 1 strip 4" x WOF
1 strip 6" x WOF
1 strip 8" x WOF
Fabric 2: 1 strip 6" x WOF
1 strip 8" x WOF
***If you are using scraps for your strips, any combination of the strips will work***
Fifth:
Now we will iron your strips so that the edges are finished.
On the top of the long (WOF) edge of your first strip of fabric, turn the edge down 1/4" and press.

Repeat for the bottom of the long (WOF) edge.
Your strip should now measure 3-1/2" x WOF.
Repeat for all of your strips of Christmas fabric. When finished, they should now measure:
Fabric 1: 1 strip 3-1/2" x WOF
1 strip 5-1/2" x WOF
1 strip 7-1/2" x WOF
Fabric 2: 1 strip 5-1/2" x WOF
1 strip 7-1/2" x WOF
Sixth:
Arrange your fabric strips, pom-pom trim, ribbon and rickrack on top of the quilt sandwich.


Seventh:
Pin fabric strips, pom-pom trim, ribbon and rickrack in place.

Eighth:
Using your walking foot, topstitch all of your fabric strips, pom-pom trim, ribbon and rickrack to the quilt "sandwich" you made.


When you are finished, your Christmas Tree Skirt should look like a small embellished quilt.
Ninth:
Trim all excess backing and batting from your quilt.


Tenth:
Find the center of your quilt.
Fold your quilt in half vertically and press.

Fold your quilt in half horizontally and press.

Open your quilt. Where the iron creases create an "X" is the center of the quilt.

Eleventh:
***Take a moment to consider the average trunk size of your Christmas tree. Artificial trees usually have smaller trunks than fresh trees.***
***Also, note which direction you would like for your Christmas Tree Skirt to face. Make sure the center line that you cut will be in the back of the tree to allow your skirt to face the correct direction.***
Find a circle template from your home (drinking glass, plate, bowl, etc.) to use to draw the hole in the center of your tree skirt. I used a glass Pyrex storage bowl so that I could see through the bowl to the "X" to make sure I was properly aligned.
Place your template over the center mark of the quilt (the "X" from your pressing lines) and draw a circle using your template.

Twelfth:
Using a ruler, draw a straight line from the middle of your center hole to the outer edge of your Christmas Tree Skirt. This line should follow your center pressed line.

Thirteenth:
Cut, following the line you drew, to the center hole in the middle of your tree skirt.

Cut out the center hole as well.


Fourteenth:
Bind using your method of choice. Remember that you are binding a circle in the middle of your Christmas Tree Skirt. Bias binding works best for this.


Voila!!!

This week, we will be making a Reversible Christmas Tree Skirt.

Here is a list of materials that you will need to make your Christmas Tree Skirt:

- 1 yard background fabric (I used Kona - White)
- 1 yard backing fabric
- Combination of 1 yard of Christmas fabrics or scraps that are at least 4" x Width of Fabric (WOF)
- Pom-pom trim (in increments of 44")
- Ribbon (in increments of 44")
- Rickrack (in increments of 44")
- 1/2 yard of binding fabric or 8 yards of pre-made binding
- 36" x 44" piece of batting (I use Warm & Natural)
- Thread to match your Christmas fabric, pom-pom trim, ribbon and rickrack
- Walking foot for your sewing machine
- Sewing machine and sewing notions
***A note about fabric and trim selections - This is a wonderful opportunity to use novelty fabrics or special fabrics that you have been saving, as well as special ribbons and trims. I am in love with the gnomes on the fabric I chose, but I also could not bear to cut up the "Unruly Reindeer" Tammis Keefe tribute fabric. I chose to use the Tammis Keefe for the back so that I would not have to cut it up. Since the Christmas Tree Skirt is reversible, I can use that side face up as well. Also, the plaid ribbon with the cherries and strawberries is from a special trip to Carmel with my great friend Alethea. I wanted save it to use for a special project and it looks perfectly Christmasy with all of the other fabrics and trim!***
Ready to Sew???
First:
First we are going to make a quilt "sandwich".

Layer your fabric and batting in the following order:
1. Backing fabric - right side down
2. Batting
3. Background fabric - right side up
Your "sandwich" should look like the photo, except with all of the edges straightly aligned.
Second:
Using safety pins, pin the layers together, the same way you would if you were making a quilt. You could also use basting spray if you prefer.
Third:
Cut pom-pom trim, ribbon and rickrack into increments of 44" in length. Make as many or as few as you would like - remember - you can always cut more later if you don't have enough.

Fourth:
Cut your Christmas fabrics into the following strips:

Fabric 1: 1 strip 4" x WOF
1 strip 6" x WOF
1 strip 8" x WOF
Fabric 2: 1 strip 6" x WOF
1 strip 8" x WOF
***If you are using scraps for your strips, any combination of the strips will work***
Fifth:
Now we will iron your strips so that the edges are finished.
On the top of the long (WOF) edge of your first strip of fabric, turn the edge down 1/4" and press.

Repeat for the bottom of the long (WOF) edge.
Your strip should now measure 3-1/2" x WOF.
Repeat for all of your strips of Christmas fabric. When finished, they should now measure:
Fabric 1: 1 strip 3-1/2" x WOF
1 strip 5-1/2" x WOF
1 strip 7-1/2" x WOF
Fabric 2: 1 strip 5-1/2" x WOF
1 strip 7-1/2" x WOF
Sixth:
Arrange your fabric strips, pom-pom trim, ribbon and rickrack on top of the quilt sandwich.


Seventh:
Pin fabric strips, pom-pom trim, ribbon and rickrack in place.

Eighth:
Using your walking foot, topstitch all of your fabric strips, pom-pom trim, ribbon and rickrack to the quilt "sandwich" you made.


When you are finished, your Christmas Tree Skirt should look like a small embellished quilt.
Ninth:
Trim all excess backing and batting from your quilt.


Tenth:
Find the center of your quilt.
Fold your quilt in half vertically and press.

Fold your quilt in half horizontally and press.

Open your quilt. Where the iron creases create an "X" is the center of the quilt.

Eleventh:
***Take a moment to consider the average trunk size of your Christmas tree. Artificial trees usually have smaller trunks than fresh trees.***
***Also, note which direction you would like for your Christmas Tree Skirt to face. Make sure the center line that you cut will be in the back of the tree to allow your skirt to face the correct direction.***
Find a circle template from your home (drinking glass, plate, bowl, etc.) to use to draw the hole in the center of your tree skirt. I used a glass Pyrex storage bowl so that I could see through the bowl to the "X" to make sure I was properly aligned.
Place your template over the center mark of the quilt (the "X" from your pressing lines) and draw a circle using your template.

Twelfth:
Using a ruler, draw a straight line from the middle of your center hole to the outer edge of your Christmas Tree Skirt. This line should follow your center pressed line.

Thirteenth:
Cut, following the line you drew, to the center hole in the middle of your tree skirt.

Cut out the center hole as well.

After cutting your center line and the center hole, your Christmas Tree Skirt should look like this:

Fourteenth:
Bind using your method of choice. Remember that you are binding a circle in the middle of your Christmas Tree Skirt. Bias binding works best for this.


Voila!!!

Your Reversible Christmas Tree Skirt is finished!
If you have any questions about this tutorial, please leave a comment below. If you make a Reversible Christmas Tree Skirt using this tutorial, please let me know, I would love to see it!!!
Winner!
The winner of last week's giveaway for Insulbrite is:

Thank you to everyone who entered!!!
BizyStitchesNovember 3, 2012 2:00 PM
Love the tutorial thanks. When I was around the age of 6 I told my parents that I didn't think there was a Santa. But low and behold on Christmas eve as I was suppose to be sleeping I heard sleigh bells ringing outside my bedroom window. So I just knew the other kids were wrong and that there really is a Santa Clause.
ReplyDeleteThank you to everyone who entered!!!
Thursday, November 1, 2012
Handmade Holidays - Oven Mitts & Potholders - And A Give-Away!
Hello and welcome to Spotted Dog Quilting Blog! Today kicks off the first tutorials in the Handmade Holidays series. This week we will be making oven mitts and potholders!

Ready to start sewing? I am breaking this up into two tutorials, one for the oven mitt and one for the potholder. Lets start with the oven mitt!
Here is a list of supplies you will need to make 1 oven mitt:

1 Oven Mitt Pattern (this is available for download below)
1/2 yard fabric for the outer pieces
1/2 yard fabric for the inner pieces
1/2 yard of The Warm Company Insul-Bright
20 inches of bias tape (either bought or made)


***To make your pattern, print both "Oven Mitt A" and "Oven Mitt B" at 100% on your printer. Tape the two pieces together matching part A and B. Cut out oven mitt shape to use as a pattern.***
Also, a note about Insul-Bright... There is a "right" side and a "wrong" side to Insul-Bright. One side is more shiny than the other and offers better heat protection. That is the side that we want facing into the oven mitt for better protection. I have taken photos of the Insul-Bright to show you the difference:
 |
| Right Side = More Shiny Side |
 |
| Wrong Side = Less Shiny Side |
First:
Cut (2) 9" x 14" pieces of fabric from the "outer" fabric
Cut (2) 9" x 14" pieces of fabric from the "inner" fabric
Cut (2) 9" x 14" pieces of Insul-Bright
Second:
Layer each set of fabrics in the following order:
1. Inner fabric - right side down
2. Insul-Bright - right (more shiny) side down
3. Outer fabric - right side up
It should look like this, except stacked even on top of each other:

Third:
Pin your fabric stacks together and quilt as desired. This is a great way to practice your free-motion quilting without committing to an entire quilt! I chose loops!

Fourth:
Using the Oven Mitt Pattern, cut your oven mitt from the pieces you just quilted. REMEMBER: YOU NEED TO CUT ONE PIECE AND THEN FLIP THE PATTERN PIECE TO CUT THE OTHER SIDE OF THE MITT. IF YOU DON'T, YOUR INNER FABRIC WILL BE ON THE OUTSIDE! MAKE SURE YOU HAVE TWO PIECES THAT LOOK LIKE THIS:

Fifth:
Now we will add the bias tape to the bottom of each mitt piece. It is best to use your walking foot for this step.
Open the bias tape and align the outer edge of the bias tape with the bottom edge of the mitt on your inner fabric. It should look like this:

Sew using a 1/4" seam.
Refold bias tape to align the middle crease with the bottom of the oven mitt. Fold under the exposed edge of bias tape until your creased edge is folded over and it looks like this from the side:

The front of the mitt should look like this:

Top stitch the front of the bias tape to the front of the mitt and trim the excess bias from the ends of each side of the mitt. You should now have two pieces that look like this:

Sixth:
Match pieces so that the inner fabric on both sides is facing out/the outer fabric is on the inside:

Seventh:
Sew around 3 outer sides, leaving the bottom open. Backstitch at both ends.

Eighth:
Clip curves and thumb joint.
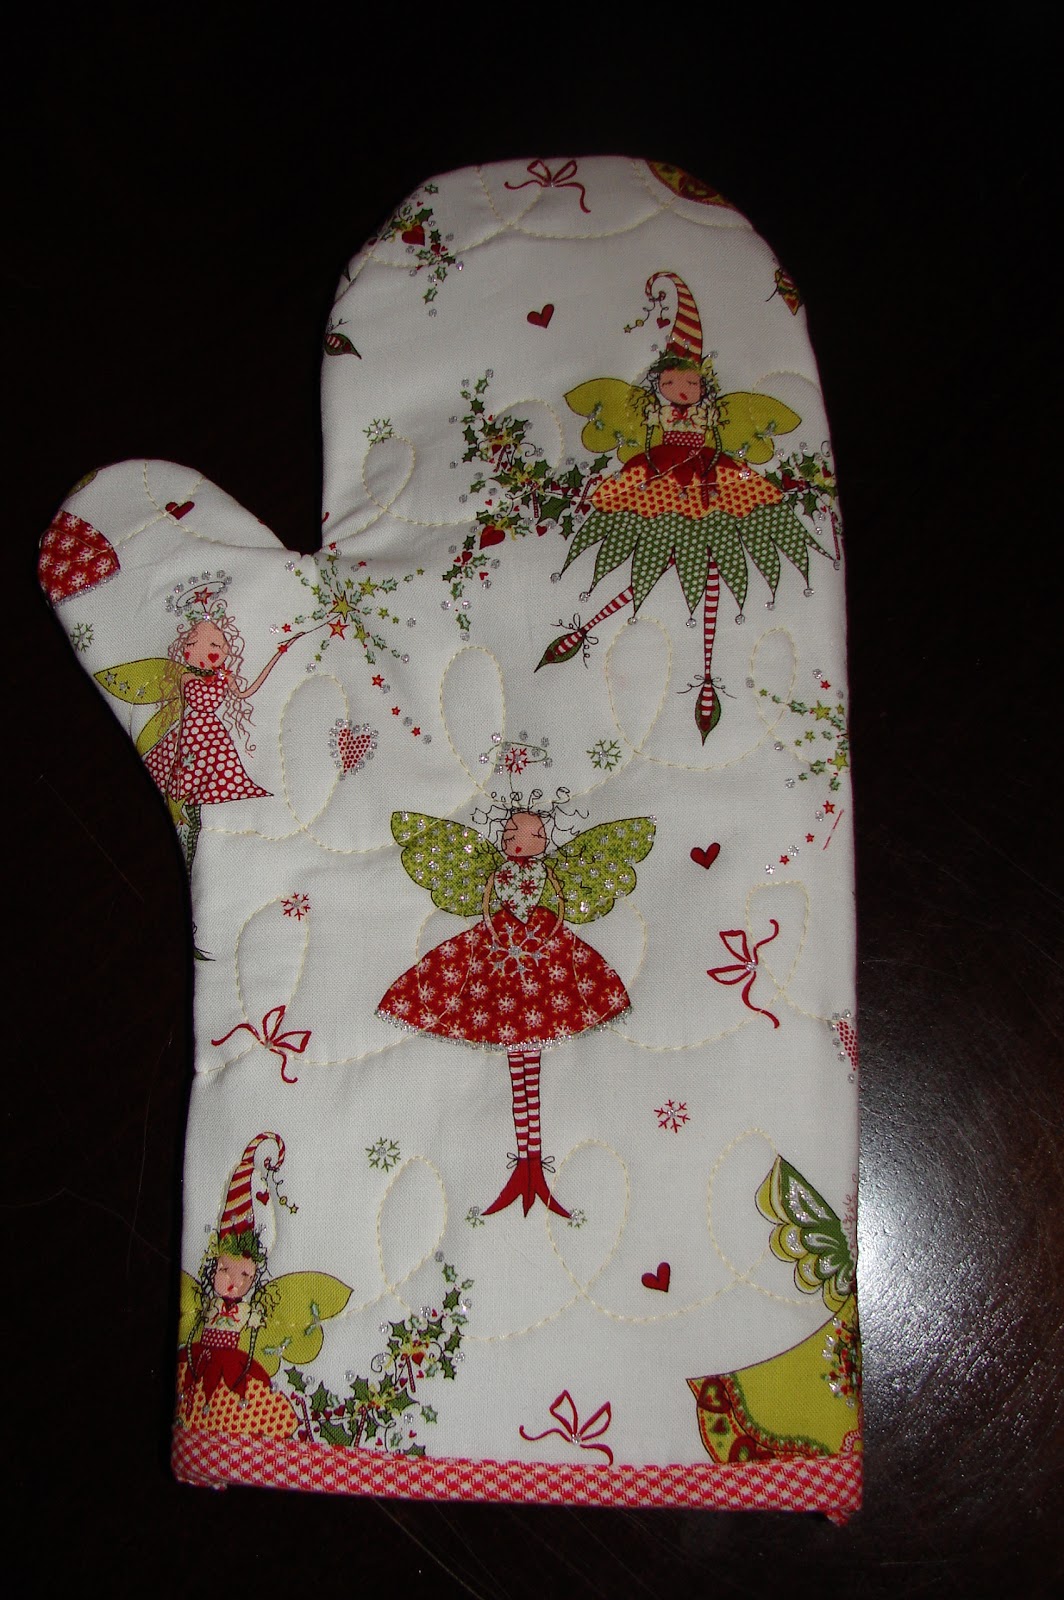
Ninth:
Turn right side out and voila!!!
NOW ON TO THE POTHOLDER!!!
Here is a list of supplies that you will need to make one potholder:
(1) 9" x 9" Piece of Insul-Bright
(1) 5" x 5" Piece of Fussy Cut Fabric for the center of your potholder
(4 or more) Pieces of scraps to accompany your focus fabric *scraps should be wide enough to go to the edge of the Insul-Bright. Make sure to include seam allowance.*
(1) 9" x 9" Piece of Backing Fabric
We are going to be using the Quilt-As-You-Go Method for making these potholders. A walking foot will work best for this project.
First:
Position your Fussy Cut Fabric onto the right (shiny) side of your Insul-Bright:

Second:
Place your 1st scrap (right side down) to your Fussy Cut Fabric and sew, using a walking foot and a 1/4" seam directly on to the Insul-Bright:

Third:
Once you have sewn your scrap, open the seam and iron:

Fourth:
Repeat with your 2nd, 3rd and 4th scrap:


Don't worry if the scraps overhang off of the Insul-Bright, we will trim those!
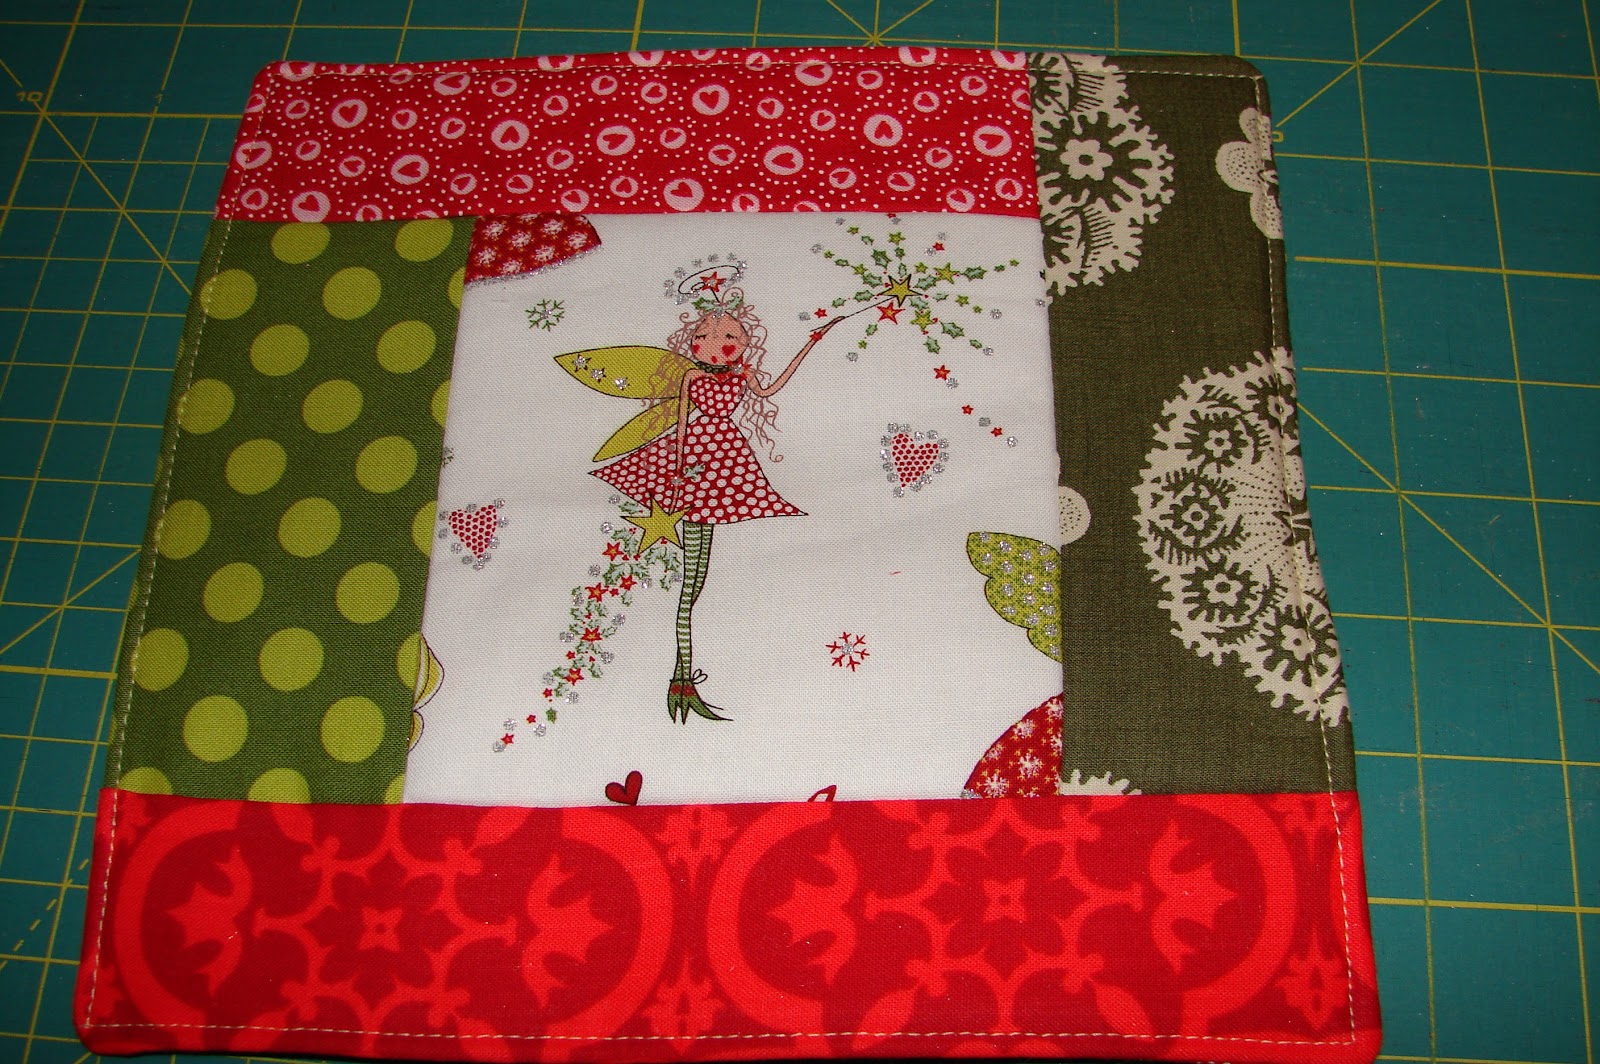
Your potholder should now look something like this:
 |
| Front View |
 |
| Back View |
Fifth:
Trim the excess off from the edges of the potholder so that they now match the 9" x 9" size of the Insul-Bright that they are sewn to:

Sixth:
Make sure that your piece of Backing Fabric is the same size as your potholder top. If it is not, trim them to match each other:

Seventh:
Place your Backing Fabric (right side down) on top of your potholder (right side up):

Align these so that all edges of the top and bottom line up. Pin the two layers together.
Eighth:
Sew, using 1/4" seam, around the perimeter of the pot holder, leaving a 3" space on one side unsewn for turning the potholder right side out.
Carefully clip all corners and turn right side out using the unsewn area as your turning hole.
When you have it right side out, it should look like this:

Ninth:
Iron flaps from the opening inside on themselves like this:

Pin the hole closed, encasing all of the raw edges of the two sides of the potholder:

Tenth:
Topstitch along the edge, catching the opening and sewing it closed.
Trim your threads and voila!!!!
I hope that you all enjoyed these tutorials! If you make either of these, please let me know, I would love to see them!!!
NOW FOR THE GIVEAWAY!
Would you like to have some Insul-Bright for yourself so that you can make these products?

Leave me a comment about your favorite Christmas memory and you could be a winner! You must be a follower of Spotted Dog Quilting Blog to win. I will pick a winner at 5pm EST on Wednesday, November 7th! Good Luck!
Subscribe to:
Posts (Atom)